Our Blog
5 Quick And Easy Steps To Create A WordPress Blog
The internet has given a voice to all the connected people of the world. You only need a good connection and any device to post your opinion. There are various platforms like social media and forums where people indulge in such discussions. However, the best avenue to present your thoughts on a specific subject or a range of topics is a blog. Here we are discussing how you can easily create a WordPress blog. This will enable you to not only share your opinions but also build up a large following that can be used to earn revenue later. Modern-day internet users know WordPress as a powerful web building tool. However, the flexible platform started as a blogging tool that later evolved into its present robust form. Let’s now discuss how you can build a blog with the CMS.
1. Purchase Domain Name And Web Hosting
You will need to have a web hosting subscription and domain name before you can start building your blog. A hosting server is where your website will reside on the web. Every interface that you see on the internet is powered by a host. The domain name, as is clear from the term itself, is the name of your blog. It is what people will type in the address bar of their browser to access your interface. Be careful in choosing a domain for your blog. Select a term that is unique and communicates the nature of your website to the target audience. Moreover, make sure that it is simple and easy to remember. There are many hosting companies that provide both the services in bundled packages. Choose a company that provides WordPress-centric services. This will help you in easily completing the next step of this tutorial. Compare the costs of different plans and purchase one that fits your budget and project requirements.
2. Choose The Correct WordPress Platform
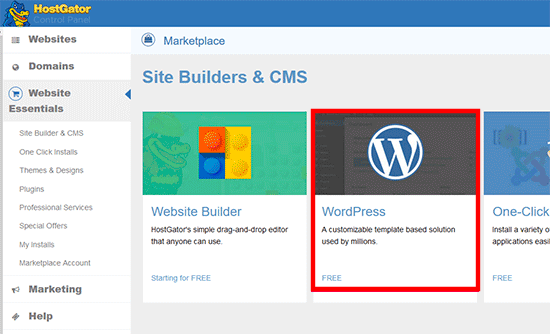
In order to begin your WordPress web development project, you will need to install the CMS. Are you aware that there are two variants of the open-source platform? WordPress.com is the fully-hosted version where you only need to select a plan and you will get access to hosting facilities apart from the free core files. However, this platform is suitable for absolute beginners as it does not provide full control over an interface. While you do not have to worry about website management and other tasks, you will face many restrictions like not being able to use plugins and custom themes. The best option is to choose WordPress.org which is the self-hosted variant. Here you can modify your interface in any way you like. You can install the files easily through your hosting account’s cPanel. The method to do the installation will vary from one host to another. Here we are showing how the process can be executed on HostGator. Log in to your account on the service on visit the Software section and click on the QuickInstall link. This will take you to another page, where you will need to select the WordPress option.
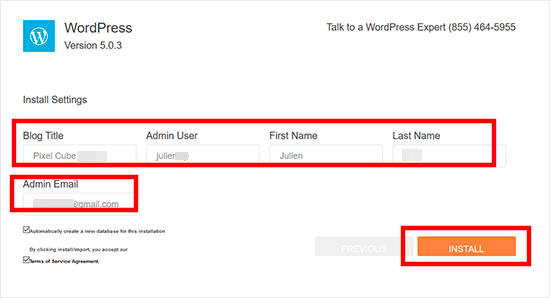
Then you will need to provide the domain where you want to install the CMS. Then you will need to enter some other details like admin username, site title, e-mail ID, etc. Provide all the information and click Install to complete the process.
3. Select A WordPress Theme
You can create a WordPress blog by selecting a readymade theme. Once you finish the installation, a default template will be provided to you. However, in order to create a visually appealing layout with some key inner pages, you will need a pre-built theme. Access the admin dashboard of your installation and visit Appearance > Themes. Press the Add New button and you will be able to view over 5000 free templates.
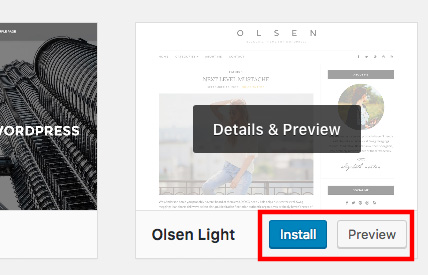
Use the filters provided on top of the page to locate a design that will be appropriate for your blog. Use the preview feature to check out the products. It will be pertinent to choose a simple and lightweight layout. Hover the cursor over a template and then hit Install. Once the installation is complete, the Install link will transform in to Activate. Press the button to activate the theme on your interface.
You can modify your activated template by clicking on the Customize link accompanying it on the Appearance > Themes page.
4. Install Some Necessary Plugins
Once you have customized your layout, it is time to add some essential plugins to your blog. You will need security and backup plugins to safeguard your interface from breaches and attacks. These tools will also create a backup of your blog so that you can restore it easily if it falls prey to a hacking attempt. Then you will need an SEO plugin like Yoast SEO to optimize your posts for search engines. Some of you will also be interested in adding a contact form to build up your subscription list. This feature can also be added through a relevant plugin. Remember not to overload your website with too many tools as it can slow it down. Visit Plugins > Add new and then use the search box to find the necessary tools for your interface.
5. Write Your First Post
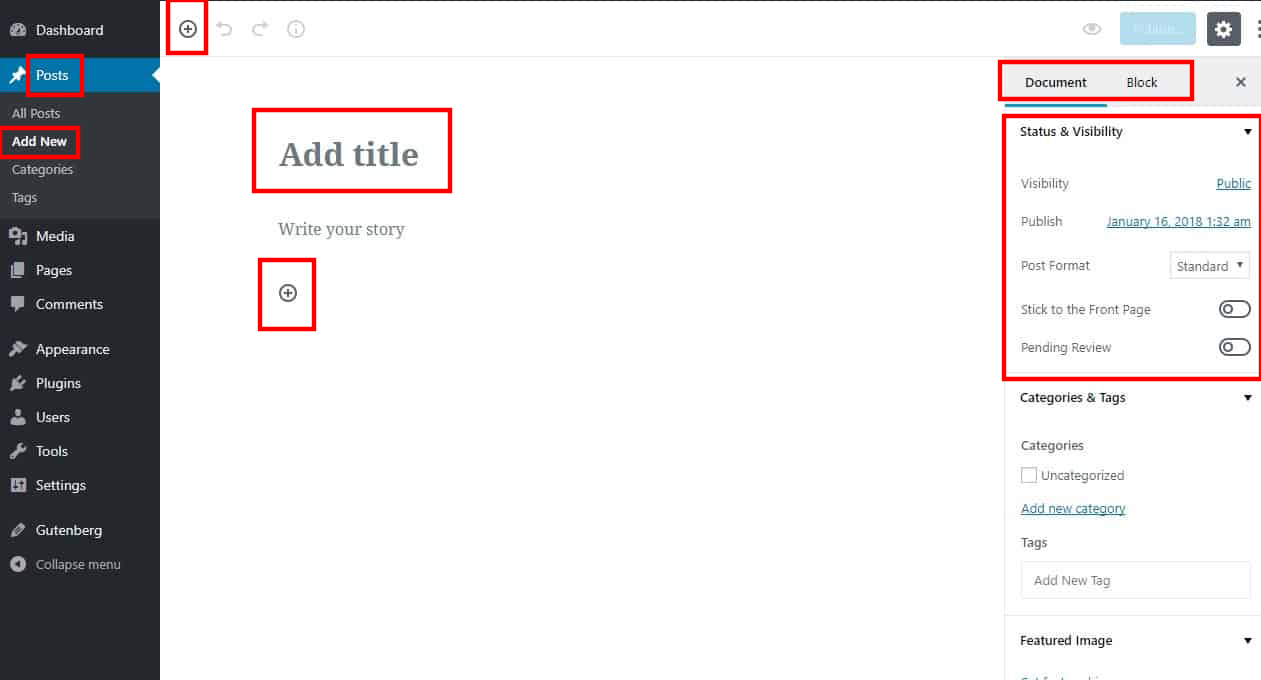
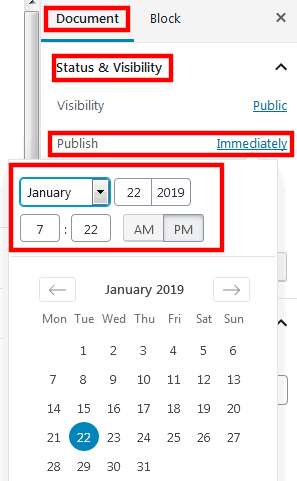
You are now ready for composing your first post. All new WordPress installations have Gutenberg as the default editor. Go to Posts > Add New to open the new block-based editor. Provide a title for your post by entering it in the relevant field. Then you can click on the add block “+” icon to add a new Paragraph block. Then you can write your content inside that block. You can also add images or embed videos into your matter by adding the relevant blocks. Each block is a completely different entity and you can style each one differently. You can toggle between the Document and Block buttons in the control panel on the right-hand side to access the different settings.
Once you have finished writing, you can configure the publishing settings in the right-hand panel. In the Status & Visibility section, you can click on the Immediately link against the Publish option and then choose a date and time of your liking. In case, you want to make the post go live instantly, you can hit the Publish button on top of the page.
Conclusion
Anyone with basic technical knowledge can use the steps discussed here to easily create a blog with the CMS. People who are looking for websites with advanced features can hire professional WordPress developers by calling +1.415.548.6170 or filling a request-a-quote form.
