Our Blog
6 Easy Steps To Enable Caching In WordPress Website
Websites slow down as more content gets added on them with each passing day. It is essential, therefore to know how to enable caching in WordPress interfaces. Caching will help in overcoming the problem of slow page loading speed. This will ensure a satisfying experience for the majority of visitors. Search engines consider page loading speed as an important aspect of the overall user experience. They use it as a ranking signal to finalize their search results. All these factors make it necessary for website owners to add caching to their interfaces. WordPress users can do so easily by installing a relevant plugin. In fact, the ease of extending a website’s functionality with plugins is one of the major reasons encouraging many people to migrate HTML theme to WordPress or switch from other platforms. In this guide, we will demonstrate the method to enable caching with the WP Super Cache plugin.
1. Install WP Super Cache Plugin
The first step naturally would be to download and install the plugin. We have chosen the WP Super Cache plugin for this tutorial. It is an open source software presented by Automattic, the same group which manages WordPress. This plugin is an effective and widely-used tool with over 2 million active installations.
Log in to the admin dashboard of your WordPress website’s installation. In the menu on the left-hand side, click on “Plugins” and go to “Add New”. In the search box provided on the screen, type the name of the plugin. Press the “Install Now” button to download its core files on your website. After successful installation, activate the plugin by clicking the relevant link.
2. Configure The Easy Settings
Activating the tool does not mean that caching will be enabled automatically. You will have to modify the settings to implement the feature on your interface. In your dashboard, go to “Settings” and select “WP Super Cache”. A screen will open with various configuration options. Click on the “Easy” tab and then in the “Caching” section, check the radio button against the “Caching On” option. Scroll down to the “Cache Tester” section and hit the “Test Cache” tab. The tool will now fetch the interface two times. It will present both the pages with timestamps to you. In case the timestamps are identical, then caching has started working on the interface.

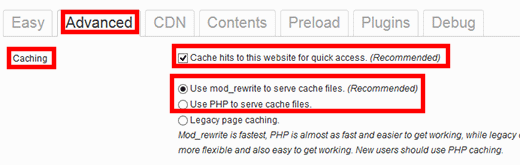
3. Configure Advanced Caching Settings
The feature is now active on your website but it will be sensible to further customize the settings. In this next step of the process to enable caching in WordPress, we will do additional settings configuration. On the plugin’s settings page, click the “Advanced” tab. In the “Caching” section, tick the box for the option “Cache hits to this website for quick access”. There are three other options with radio buttons below it. The tool, by default, checks the second option and uses PHP to serve cache files. However, you must check the first option called “Use mod_rewrite to serve cache files”. The reason for this change is that using PHP can consume a lot of hosting resources. Press the “Update Status” button at the bottom of the screen.
You will now be notified that the mod_rewrite rules need to be updated. Move down the page and hit the “Update Mod_Rewrite Rules” tab. After the rules are updated, you will be greeted with the following success message:
![]()
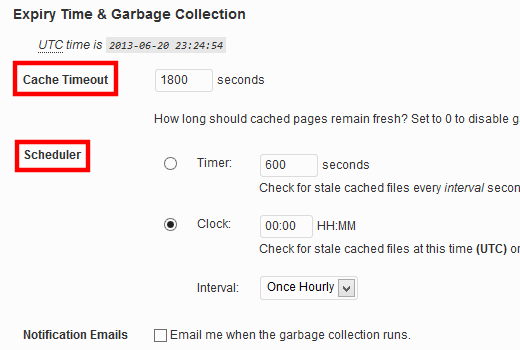
4. Set Garbage Collection Schedule
The tool will also notify you about setting a garbage collection schedule. Move down the advanced settings screen to locate the “Expiry Time & Garbage Collection” section. The first option is “Cache timeout” where you can set a time in seconds. Cached files will be treated as stale after the time elapses and will be deleted. You can use the “Scheduler” to set the frequency of the garbage collection procedure.
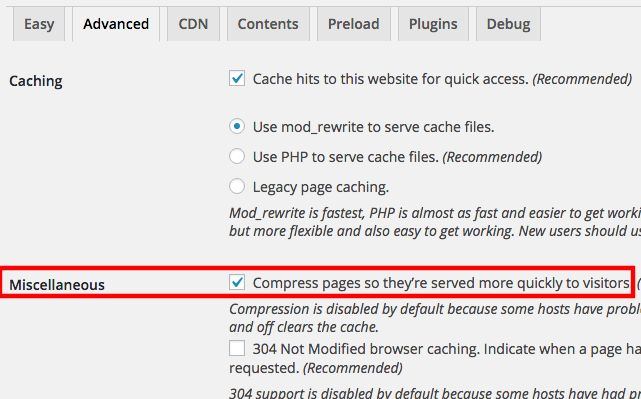
5. Enable Compression In The Settings
In the advanced settings screen, locate the “Miscellaneous” section which is present just below the “Caching” section. In it, check the box against the first option “Compress pages so they’re served more quickly to visitors”. This will enable compression and let the plugin compress the cached files which will then be served to users. Browsers require less time to download such files as they are smaller in size than regular files.
6. Set Up A CDN
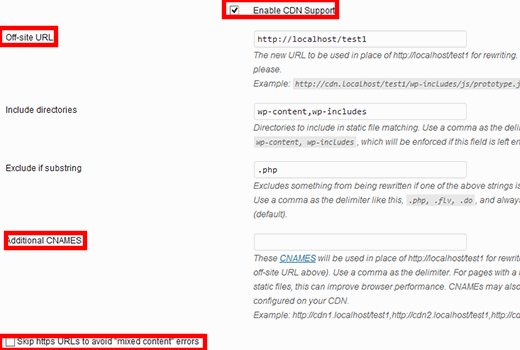
Various static files such as JavaScripts, images, stylesheets, etc are served by websites while handling page requests. A Content Delivery Network (CDN) can be used to deliver these files. WP Super Cache users can easily set up a CDN by modifying the settings. Click the “CDN” tab which is located just beside the “Advanced” button. Tock the box against the option called “Enable CDN Support”. In the “Offsite URL” field, enter the URL of the pullzone. Moreover, provide CNAMEs, if any in the “Additional CNAMES” section. Tick the “Skip https URLs to avoid “mixed content” errors” option. Save the changes and now static website content will be served through a CDN.
Conclusion
This simple process will help users to enable caching in WordPress websites through a plugin. It will optimize and speed up an interface and ensure that visitors access the pages quickly.