Our Blog
6 Simple Steps To Create A Website With WordPress
It will not be incorrect to say that WordPress is the most popular web building platform in the world. The CMS is the force behind 34% of all the websites in the world. The open-source platform has revolutionized the field of world development by empowering nearly everyone to easily build an interface. You do not need to be a programmer or possess high levels of technical knowledge to create a website with WordPress. Here we are presenting you with a simple guide to build an interface with the popular development solution. Using this procedure, you can quickly create a website without any hassle.
1. Purchase Domain name And Hosting Subscription
Before you start the process of website creation, it will be pertinent to pick a name for your interface. In case, the website is going to represent your business, then the term must be the same as that of your enterprise. You can also choose a name that is associated with your industry or profession. Domain names must be short and unique so that people can remember them easily. Once you have identified a suitable phrase, then you will have to register it and buy a hosting subscription. You have the option of ap[proaching different service providers for fulfilling both the requirements. However, there are many hosting companies that provide domain name registration facilities as well. Do not make the mistake of choosing a service based on cheap prices. Go for a reliable company that offers WordPress hosting. They will have various hosting and domain bundled packages aimed at different user groups. Remember that the domain registration will expire after the period specified in the package. Make sure to renew it before the expiry date.
2. Install WordPress Through Your Hosting Account
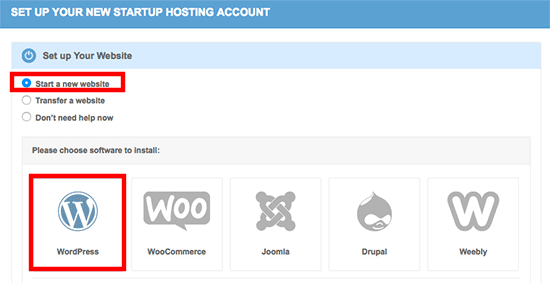
Whether you are building a new interface or converting a website to WordPress, you will have to first install the CMS on your system. The process can be done easily through your hosting service. As mentioned before, you must choose a company that offers WordPress-centric services. This will be helpful in easing many website building and management tasks. The process to install the core files varies from one service provider to another. Here, we are showing how the process can be done on SiteGround.The following screen will be visible when you log in to your account for the first time:
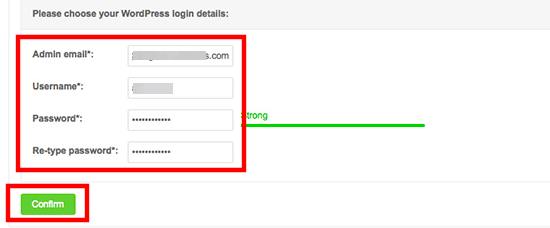
Select the Start a new website option and then click on the WordPress icon. This will activate the installer wizard which will ask for a username, password, and email for the administrator.
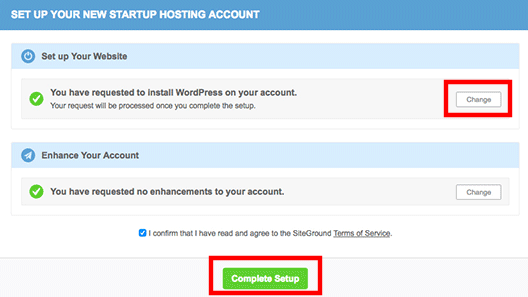
Once you click on the Confirm button, you will be directed to another screen where you need to click the Complete Setup button.
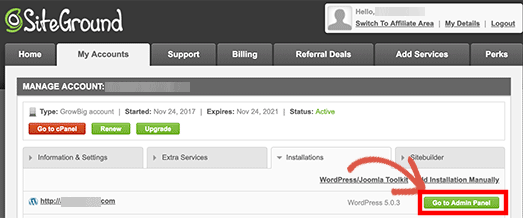
The core files will now be installed and you will see a link to visit the admin dashboard of your website.
3. Configure Some Basic Settings
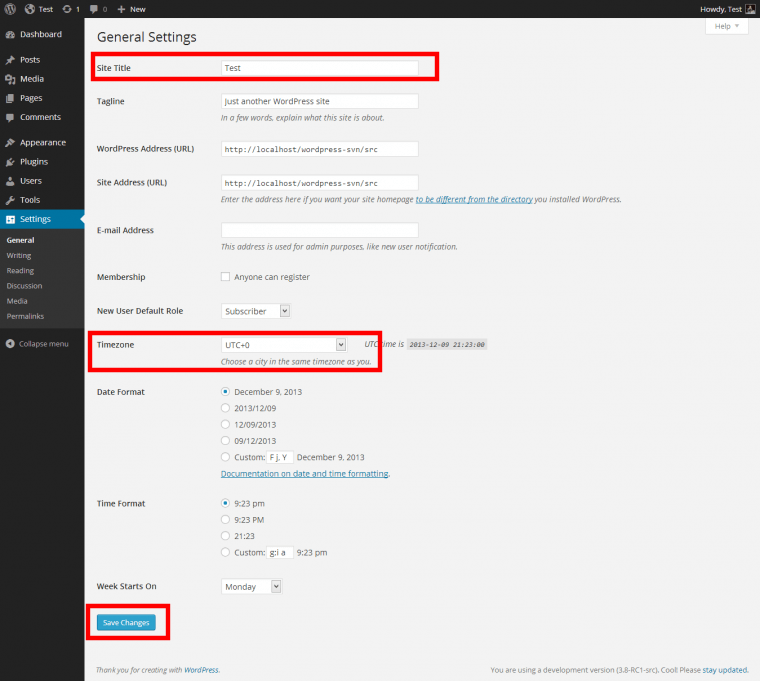
We will now configure some basic settings of our website. Go to Settings > General in the dashboard. Provide a title for your interface in the specified field. You will also have to choose a timezone from the dropdown menu in that section. Choose a setting that will be suitable for your target audience.
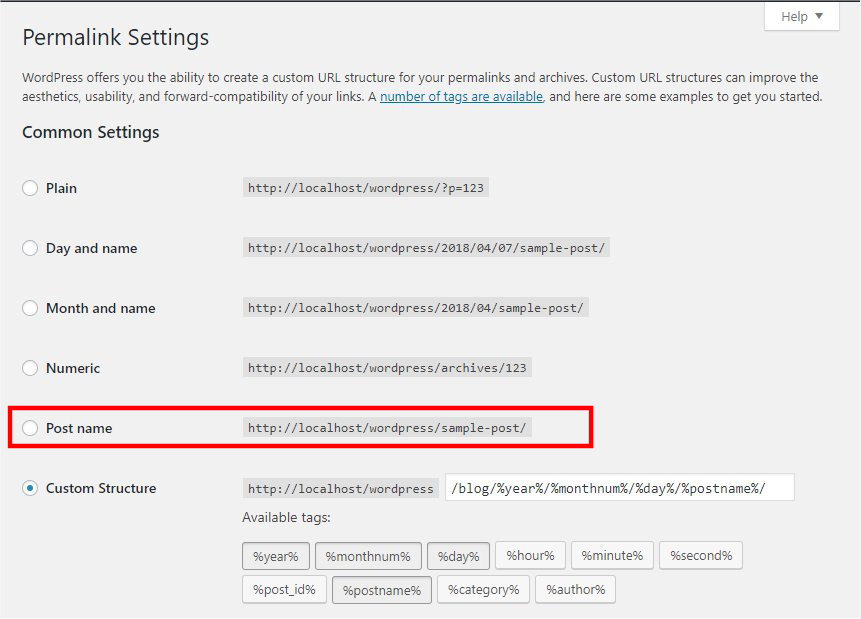
Now visit Settings > Permalinks. Here you can choose the URL structure for your pages. Choose the Post name option as shown in the image below.
Go to Settings > Reading and confirm that the box in the Search Engine visibility is not checked.
4. Select And Customize A Theme
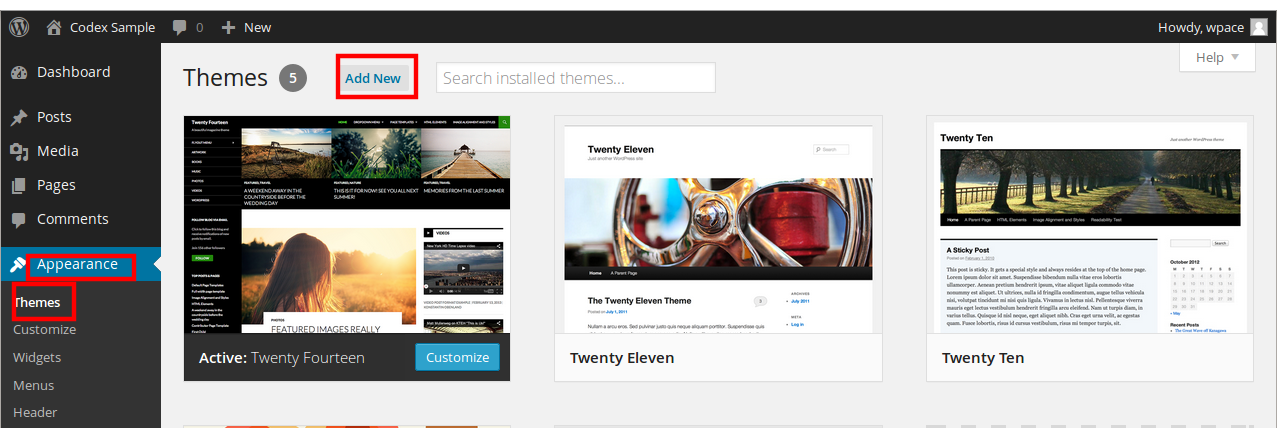
In this step of our guide to create a website with WordPress, your interface will finally start taking shape. Every WordPress installation contains a default theme. However, it will be pertinent to replace it with another design. The open-source platform has a vast library of pre-built templates that have been sorted into different categories based on popular industries. You can choose a layout from a specific category or choose a general-purpose theme in case you do not find one for your category. You can search for templates on the official theme directory of the CMS or get one from third-party developers. Visit Appearance > Themes from your dashboard. Then click on Add new and upload the files of the template that you acquired.
Now go to Appearance > Customize in the panel. You will now access the theme customizer. Here you can modify your layout according to your requirements. Simply click on the items in the left-hand panel to expand the menu and then conduct your changes. You can add your homepage, create a menu, and modify the appearance of different sections. You can also change the typography and color scheme of your interface. All the changes can be previewed in the section on the right-hand side.
5. Install Some Key Plugins
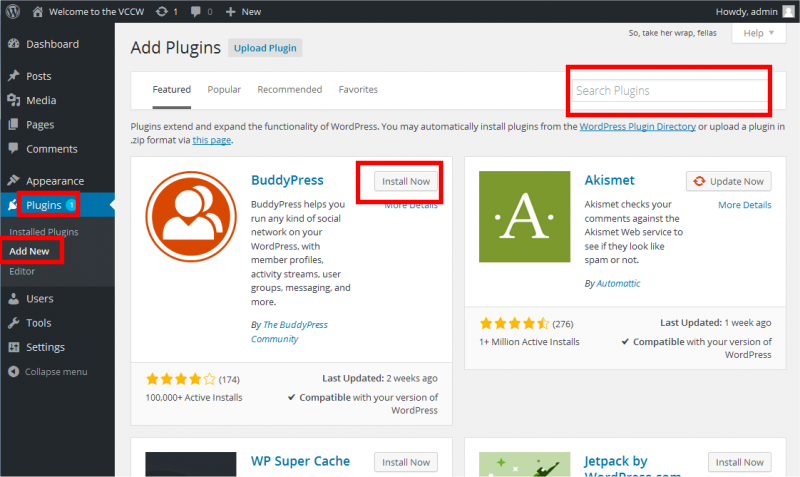
Plugins allow you to easily extend the functionality of your interface without writing any code. WordPress has a vast collection of free and premium plugins. There are some key tools that you must install on your website. You must activate a security plugin to protect your interface from breaches and hacking attempts. Then there must be a backup plugin that will automatically create a backup of your website at time intervals defined by you. Another handy tool that you must have is Yoast SEO. This plugin will help you enhance the SEO-friendliness of your website. You will also need a contact form plugin so that you can create and add lead generation forms to your key pages. Go to Plugins > Add new in your dashboard. Use the search feature to find your desired tools. Click on the Install Now link next to your selected tool. Once the installation is complete, the link will change to Activate. Hit the link to activate the tool on your website.
6. Add New Pages To Your Website
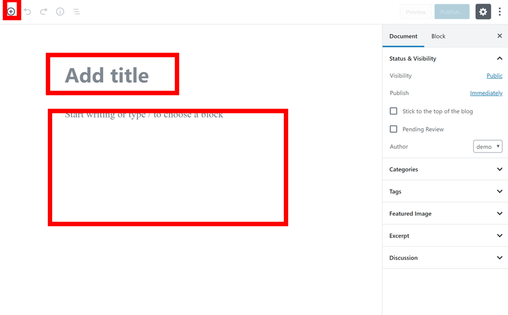
The basic pages of your interface will be included in your theme. However, you will want to add some new pages to your website. This can be done by visiting Pages > Add New. Enter a title for your page in the specified section. Click on the Add block icon on top of the screen and choose the content block which you want to include in your page. Hit Publish once you complete the changes. The page will be added to your website.
Conclusion
This simple process will help you to create a website quickly. However, if you are looking to hire top-quality WordPress developers then you can call us at +1.415.548.6170 or fill a request-a-quote form.
