Our Blog
2 Quick Ways To Create A Custom Scrollbar In WordPress Websites
WordPress is the undisputed king of the CMS market cornering over 60% of the share. One of the major reasons for its widespread popularity is its flexible nature. The CMS gives you total control to users over every aspect of their interface. While beginners can create a website without writing any code, developers can personalize an interface through custom programming. Here, we are discussing the methods to create a custom scrollbar in WordPress. This unique element can enhance the appearance of your layout and give it a distinctive look. In this guide, we are presenting two ways to conduct the process. You can choose one based on your skills and comfort level.
1. Manually Create A Custom Scrollbar
Many users will be thinking that since WordPress uses CSS, we can easily re-define the styling of our navigational tool. However, it is not such a straightforward process as there are no pre-defined rules in CSS which can be used to alter the properties of the scrolling element. Some developers use pseudo-elements which are unique to browsers to override the pre-configured appearance settings of the interactive tool. JavaScript is also used by some professionals to achieve the same result.
Here, we will show you how you can add the scrollbar with a personalized appearance by adding custom CSS. Remember that the result of the process will be visible only in those browsers which use WebKit. For the uninitiated, WebKit is a rendering engine used in browsers like Google Chrome, Opera, and Safari. It helps in displaying an HTML/CSS page in a browser. Since Firefox, Internet Explorer and some other browsers do not use the engine, the method explained here will not work in them. Moreover, the altered element will also not be visible in mobile browsers.
In case, you are using this process, then do test it on different browsers before making the change go live. Use the following steps to add the custom element:
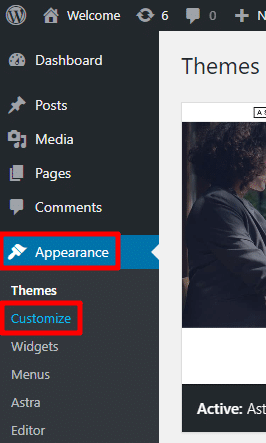
i. Access The Theme Customizer
Most tasks in WordPress can be easily done through the admin dashboard. This intuitive control panel makes it convenient for non-technical users to manage their interfaces. Log in to the dashboard of your website. Now, locate Appearance in the menu on the left-hand side. Once you find it, choose the Customize option under it. This will open the theme customizer of your installation. This is a handy tool which lets you preview the changes before you confirm them.
ii. Add The Custom CSS
Once the customizer is open, you will see a control panel on the left-hand side and a preview of your page on the right. There are numerous expandable options included in the menu. You will have to locate the Additional CSS option in the panel.
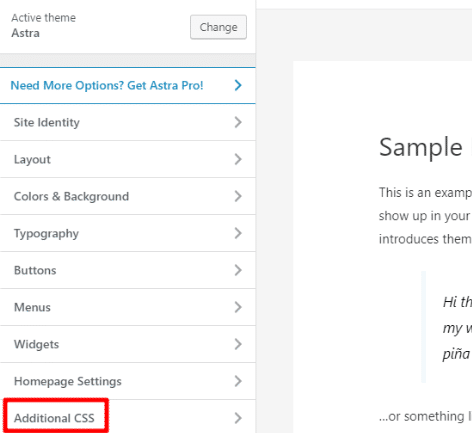
When you click the option, it will expand to show a box where the styling code can be added.
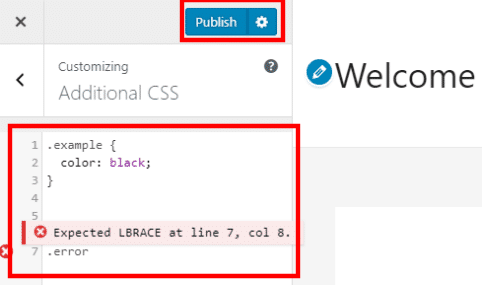
You will have to add the custom CSS displayed below to that box.

You can alter the properties and the colors used in the above program according to your preferences. Preview the changes on the left-hand side and then hit the Publish button located on the top. Open your website in a compatible browser to check whether the new element is visible or not.
2. Create A Custom Scrollbar With A Plugin
Did you just convert site to WordPress? Then this method will be suitable for you. It does not involve entering any code and instead uses a plugin to do the needful. Let’s take a look at the step-by-step process of creating the custom tool with a plugin.
i. Install The Advanced Scrollbar Plugin
Plugins allow people to add new functionality or a feature to their websites without writing a program. This is convenient, especially for new users of the platform, who may not be technically proficient. As mentioned earlier you can control all aspects of your interface through its dashboard. Log in to your installation’s panel and go to Plugins. Hover over the option and then choose Add New. In this guide, we will use a plugin called Advanced Scrollbar. Enter the name of the tool in the search box on the page which now opens. Click on the correct option to install its files. Activate the solution before moving to the next step.
ii. Configure The Plugin Settings
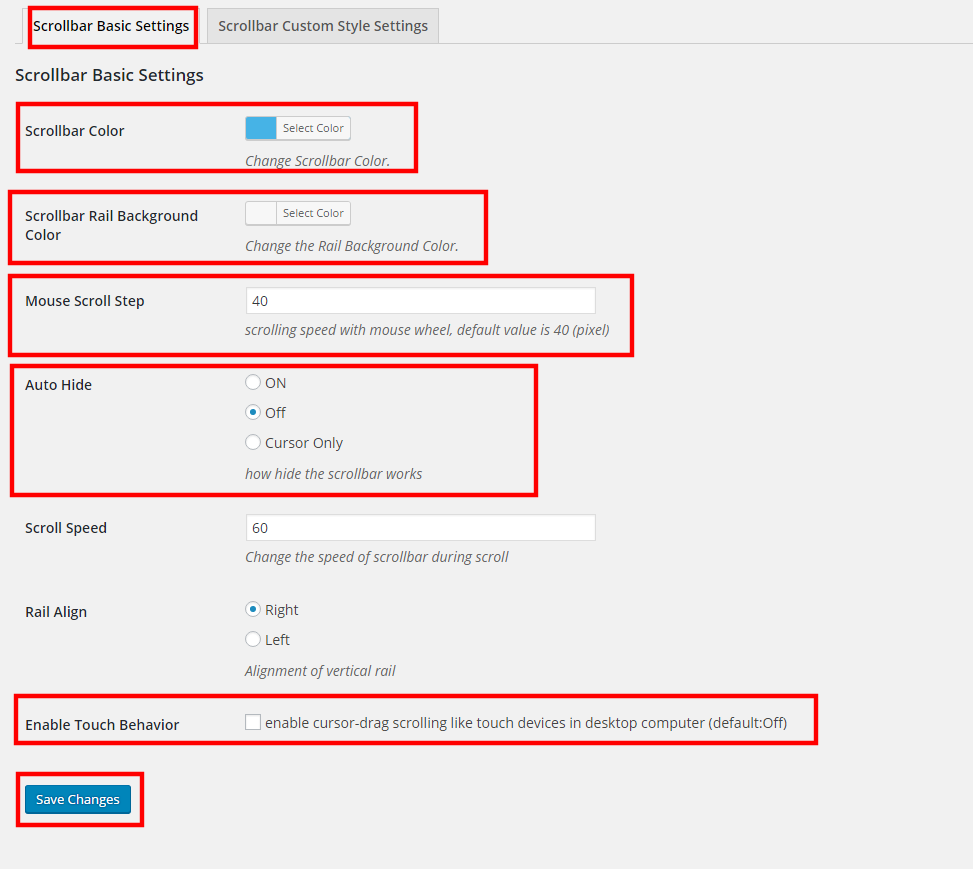
After activation, visit Settings in the dashboard and then choose Custom color scrollbar settings. Here, we will configure the settings of our installed tool. By default, the first tab named Scrollbar Basic Settings will open. One this screen, you can choose a color for the scrollbar as well as its rail. You can also set the scrolling speed of the mouse wheel in the Mouse Scroll Step field. There is also the option of choosing to display the bar constantly or auto-hide it. Users are also allowed to enable touch behavior by ticking the relevant checkbox. Press the Save Changes button located at the bottom and your custom navigational element will now be functional on your interface.
Conclusion
These are two quick and easy methods to add a customized scrolling tool to your website. However, as explained before, the manual method will not work on browsers which do not use WebKit. Some users may also feel that the personalization options in the plugin do not match their specific needs. The best option, in such cases, is to hire an experienced WordPress website development professional to do the job.