Our Blog
6 Simple Steps To Create A WordPress Auction Website

A large number of people are looking to earn money by monetizing their websites. Selling physical or digital products on the internet has emerged as a good business option. Apart from offering products for a fixed price, you can also earn money by auctioning them online. Interested customers will bid on items they like and the highest bidder will get to buy the desired product. While website owners on other platforms may have to hire professionals for building their interface, WordPress users face no such hassles. They can easily create a WordPress auction website without needing to write a single line of code. Just follow the stepwise procedure discussed here and you will successfully build a bidding interface with the open source platform.
1. Build The Infrastructure For Your Website
In order to create an efficient website, you need to build the necessary infrastructure. You are choosing WordPress as your development platform but are aware of its two variants. WordPress.com is a hosting platform which is totally free but it will restrict your choice of plugins and themes. You must choose WordPress.org which is a self-hosted platform. Here you will enjoy total control over every aspect of your interface. You will need to subscribe to a domain name and hosting service. Select an agency which provides specialized WooCommerce hosting as we will use the plugin to create the base for our interface. Research and compare the prices and services offered by different firms. Choose one which suits your requirements and your budget. Install the core files of the open source CMS on your system and move to the next step.
2. Install The WooCommerce Plugin
We will first create a simple e-commerce website with the help of the WooCommerce plugin. It is one of the most widely-used solutions for building online stores in the world. This 4.5-star rated product is one of the most downloaded pieces of software in the WordPress universe. It provides all the necessary elements required for an online commercial venture. You can build product pages, manage inventory, add shipping and payment options and do a lot more with the tool. Access the admin panel of your WordPress installation. Go to Plugins in the menu and then select Add new. Search for the plugin and then install it on your interface. Activate the tool and proceed to the next stage.
3. Convert Your Online Store Into An Auction Website
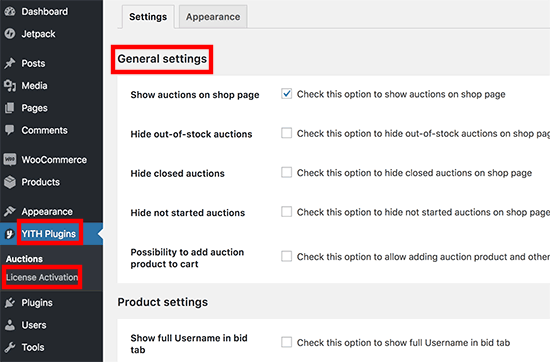
Once you have configured the WooCommerce settings, your e-commerce website will start functioning. It is now time to convert it into a bidding interface. This can be done by using another plugin called YITH WooCommerce Auctions. This premium product is an extension of WooCommerce and will help you create a WordPress auction website. Just like we did in the previous step, search for the plugin and install its files. Activate it and then go back to your dashboard. An option called YITH Plugins will be visible in the menu. Click on it and go to License Activation. You will be asked to provide a license key. This code can be acquired from your profile on the tool’s website.

Now go to YITH Plugins > Auctions to open the solution’s General Settings screen. Modify them according to your preferences and save them.
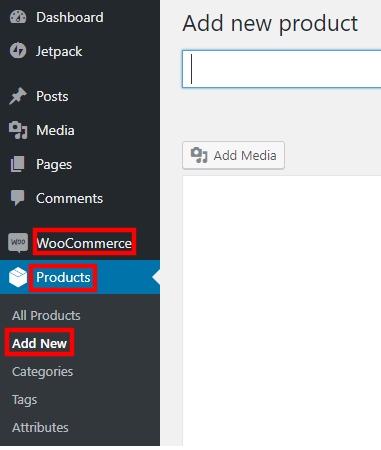
4. Add A Product For Auction
The YITH WooCommerce Auctions is an add-on for the popular e-commerce solution. This means that you can list an item for auction by using the WooCommerce functionality for adding products. In your control panel menu, locate WooCommerce and go to Add New option in the Products section.
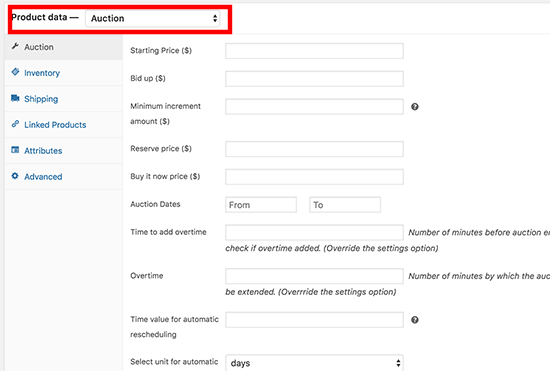
Scroll down and below the editor, you will find the Product Data option. Select by clicking the dropdown menu next to it. This will open the settings for the item being put up for auction. Define your starting bidding price, minimum increment amount, reserve price, and the buy now price. Configure the date and time settings for the auction. After making all the configurations, hit the Publish button. The item will now be displayed on your store.
5. Manage The Auctions
Technically your bidding website is now operational. Whether you are converting PSD to WordPress or switching from any other platform, you can use this simple process to create an auction interface. However, you must know how to manage the auctions. As shown in the previous step, the item is displayed once it is successfully added as a product. The auction though will start only at the time specified by you. Once bidding starts, an auction timer will be displayed alongside the item.
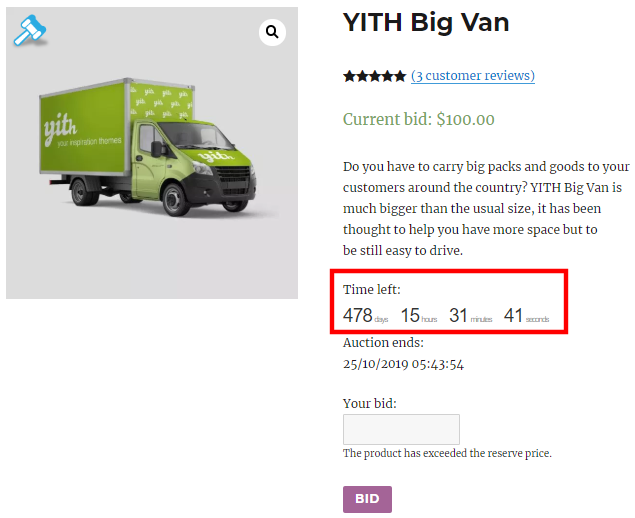
Registered users will be allowed to take part in the process and they can see the current highest bid.
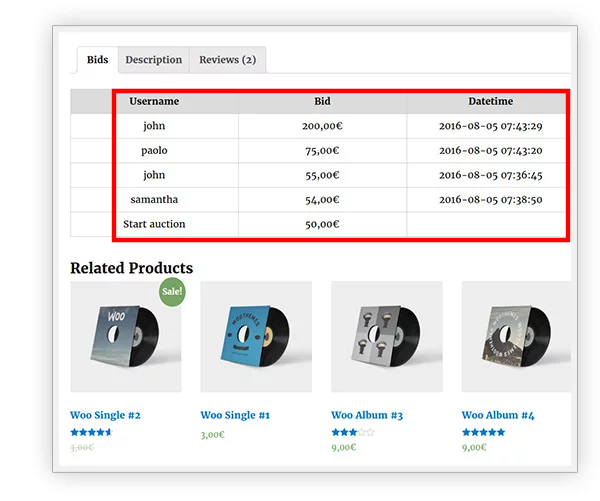
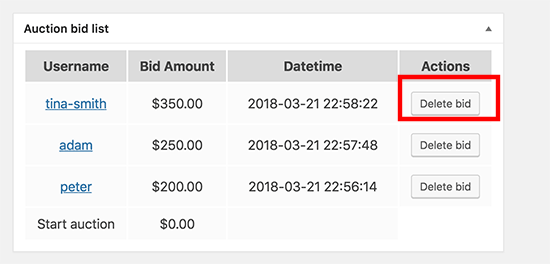
You can remove a bid by editing the auction item. An option to delete the bid will be displayed against each offer.
All particiapnts will receive e-mail notifications about new bids, end of bidding, etc. The final e-mail will be sent to the winner.
6. Enable Other Users To Add Items
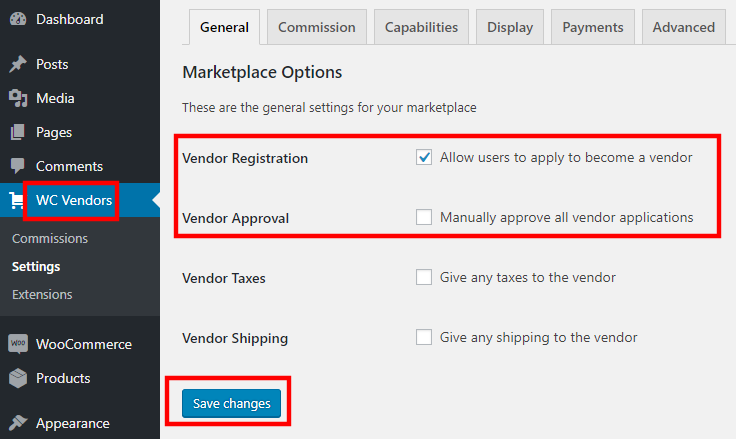
WooCommerce by default will consider only you as the authorized seller on your interface. In case you want to enable other users to add items, you will need to do some changes. You will have to convert your store into a multi-vendor marketplace. This can be done by using the WC Vendors plugin. Install and activate the tool in the same manner as explained earlier in this tutorial. Configure the settings of the plugin an authorize users to become sellers on your website.
Conclusion
This simple process to build a bidding interface showcases the simple nature of WordPress website development. It empowers anyone to create a fully-functional e-commerce interface without writing a line of code.