Our Blog
A Basic Tutorial For WordPress Plugin Development
WordPress has revolutionized web development like no other service and its inherently user-friendly nature has made it the first choice for a large number of developers as well as other users. Plugins are its one of the most convenient features which allow a person to extend the functionality of an interface in an easy manner. With the passage of time, WordPress plugin development has grown into a field in itself and people are approaching firms with requirements of WordPress custom plugin development. In this guide, some basic information about creating a simple plugin is being presented for the benefit of users looking for help on the topic.
1. Understanding The Folder Structure Of WordPress
Extending the functionality of a website becomes very easy with plugins and a user can easily find one for his/her requirements but some conditions may necessitate the hiring of a WordPress plugin development company. It also gives a person the chance to create a unique functionality that will work in complete synchronization with his/her website. Knowledge about PHP, JavaScript, HTML, and CSS is required to be able to work on WordPress and a user must also possess information about the folder structure of WordPress which is where the plugins directory of a website is located.
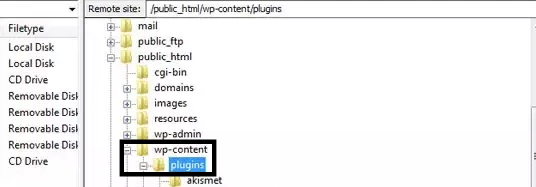
Log in to the FTP server and go to the WordPress installation where you will find the “wp-content” folder and on opening it, you will find the “plugins” folder. All the plugins that the website is using are stored here and you should create a sub-directory named after the new plugin that you intend to build in the plugins folder. The sub-directory will house all the files like JavaScript along with the PHP functions. Users must also include a readme.txt file which should include the name of the plugin and its description if they plan to offer it to other people for download.
2. Creating The PHP File
In this guide, we will be explaining the creation of a simple plugin which will shorten post excerpts and the process starts with the writing of a simple PHP file.
1 <?php
2 /*
3 Plugin Name: Plugin Name
4 Plugin URI: https://www.hirewppluginurl.com/
5 Version: Current Version
6 Author: Creator Name
7 Description: What does your plugin do
8 */
9 ?>
Take a look at the above code which includes the comment information about the new plugin which helps WordPress in identifying and processing the file. You can simply use this code for writing the program for your plugin but remember to fill in the relevant details in place of the generic terms. In line 3, the chosen name of your plugin must be mentioned while in the next line the URI must be included. Similarly, provide the version name in line 5 and in the following line put your name as the author of the plugin. Finally, in line 7 provide a brief description of the functionality that the plugin provides.
Remember that WordPress already contains a lot of functions and to avoid duplication, prefix a label to all variables and functions. You can get an idea from the below example and replace hirewp with a term of your choice.
1 <?php
2 define(“exampleVariable”, “this is a value”);
3
4 function hirewp_content_example_function( $limit ) {
5 // some code goes here
6 }
7
8 ?>
3. Learn About Filters And Actions
A person must know about filter hooks and action hooks to develop a WordPress plugin. Actions are activated by an event like the logging in of a user or loading of a page. The API documentation of WordPress contains a detailed actions list which can be used to target pre-defined areas in templates and the admin panel. The add_action() function is used for calling actions.
Filters, on the other hand, control how something happens or modify an already defined output. They allow users to change data through own custom written filters and present a modified output.
4. Adding The Final Function
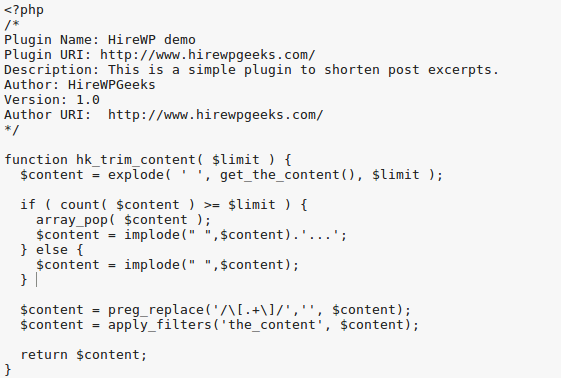
We will now be adding the final function to finish the code for our plugin for shortening post excerpts. The following code must be inserted after the header comment or included in the functions.php file. This will help create post content with limited characters.
= $limit ) {
array_pop( $content );
$content = implode(” “,$content).’…’;
} else {
$content = implode(” “,$content);
}
$content = preg_replace(‘/\[.+\]/’,”, $content);
$content = apply_filters(‘the_content’, $content);
return $content;
}
?>
The above code will replace the $the_content which is a variable that contains the complete content of a WordPress post. Take care to change the name of the function from hirewp_trim_content() to the name of your choice. Now consider the parameter of this function $limit which should store an integer signifying the number to which you want to limit the displayed characters. The parameter must also be specified in the template files so that the function is called properly.
5. Installing And Running The New Plugin
This is how the final program will look like and this file must be saved in a PHP document and uploaded to the wp-content>plugins directory. Activating it now would not give the desired result.
Now go to the appearance> editor of your template and locate the single.php file which contains all the HTML or CSS for a post page. Find the_content() and replace it with the code given here:
This will set the character limit for the displayed post at 50.
Conclusion
This tutorial for WordPress plugin development gives a basic idea about how a new plugin can be created and people looking for custom solutions can call +1.415.548.6170 and request a quote.