Our Blog
Setting Google Site Kit for your WordPress plugin
The popularity of WordPress in a short span has made it a sensation over virtual platforms. Because of this immediate success, Google itself has assessed several search queries requested for WordPress plugin development. The plugins and other pieces of information regarding WordPress website designers were the most sought after searches on google. Hence, google expressed the idea of forming an interactive coalition between the two popular platforms. With combined efforts from both sides, at last, the google site kit was hoisted, which was the first interaction of its kind.
What are these Site Kits for WordPress?
The prime function of these site kits is to ease up the setting of google tools on the user’s site in a single dashboard present inside the WordPress. The significant advantage it had was that the user would not require further coding and intricate programming to make things work.
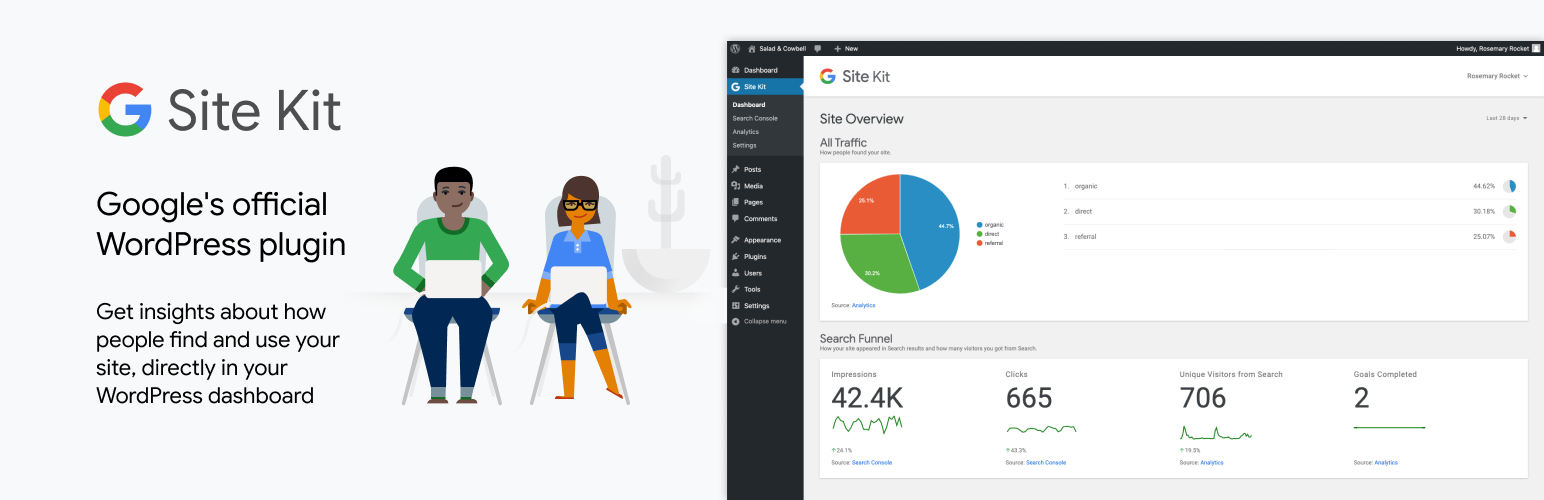
Google has recently launched WordPress plugin development for WordPress, which will help users find your site. Google kit will provide some insights from the critical google tools, using which users can manage and deploy various sites in one place. Users can also update your ideas up to date and get the authority directly from the dashboard of the WordPress website designer for easy access which is free to all the users.
If you are a user of a particular website and you wish to show your website to all the people in the google, Site kit is the answer to all your queries. The kit is designed to enhance a website or blog’s online presence as well as to set up metrics for a better understanding of WordPress website designer.
How to install Google Site Kit for WordPress:
WordPress staging website for testing the Google kit plugin is strongly recommended for the WordPress plugin development as the Google kit plugin is currently available in beta versions.
By following these steps, you can achieve the successful activation of the site kit.
1. The first crucial step towards it is to download the Google kit from your favorite website and search for the project’s GitHub repository. Once you have downloaded the Google plugins open dashboard, look for the plugins, select Add new and then click on Upload Plugins.
2. Upload the file with.Zip extension which you have already downloaded and then click on the Install button.
3. Once your Google site kit has been installed from the.Zip file, activate it by a single click on the Activate Plugin button.
4. After you have activated the plugin, the Google site kit will be activated on the site and now to further integrate Google services in your WordPress website click on the start setup menu.
5. To move forward, you have to generate the client ID, which you can do by visiting developers.google.com/web/sitekit.
6. Once you click the site kit from the dashboard, you will be able to see that all the information related to your website is already being promoted and processed by Google. Now all you have to do is click on the Get OAuth Credentials button. For additional safety, copy your OAuth credentials and then click on the done button.
7. Again revert to the dashboard of the WordPress and select site kit where you will have to paste your OAuth Credentials and then click on proceed.
8. Now the second integral step is to sign in with your Google account so that you can authenticate your WordPress website with Google.
9. To complete the authentication process login with your valid Google account.
10. The third significant step is to verify your website, which you can do by copying the URL of the site and then click on continue.
11. The fourth mandatory step is to add the Google search console in the website of the WordPress which you can do by clicking on the allow button and then granting permission to the Google site kit.
12. Google will ask for some access privileges from the WordPress website, which you have to confirm by clicking on the allow button.
13. With all these steps, you will finally end up completing your Google site kit setup, and your WordPress website will be connected to Google and Google search console. There are three more recommended settings which you can do by going to the dashboard.
To add Google AdSense, go-to site kit and then settings. Further, go to connect more services and then AdSense, Now click on setup AdSense. At last click on create AdSense account button if you don’t have any.
To set up Google Analytics again go to connect more services then Analytics and then click setup Analytics. If you don’t have an account click on the Create Account button at last.
To connect Google PageSpeed Insights, select PageSpeed Insights from join more services and then click on setup PageSpeed Insights. Now generate your API key by visiting developers.google.com/web/sitekit/apikey and then get your API key button and copy its value in the provided text area and click on the proceed button.