Our Blog
Simple guide for manual custom WordPress template development
The open source CMS has become the first choice for majority of developers as well as owners for creation of highly attractive and productive virtual interfaces. The platform is well equipped with a number of pre- built themes that can be utilized for the purpose of website creation but some circumstances may require unique WordPress template customization. A simple guide with some easy to use steps that can be employed by any person with basic knowledge of the elements of the platform for custom WordPress template development, is being presented here.
Structure Of A Theme
Before moving ahead to understanding the steps involved in the manual creation of a custom WordPress theme, let’s comprehend its basic structure. A simple theme needs just two basic files, namely- style.css and index.php. The CSS file contains everything about the theme that the platform needs to use and index.php is the template file with the PHP template tags along with header.php and footer.php which are used for all pages of a website. A developer can add even more files according to the requirements of the project and in this article we will be explaining the method through the creation of following five files :
– header.php
– footer.php
– index.php
– sidebar.php
– style.css
Apart from these, two Bootstrap files will be added for easy installation of navigation bar, grid, buttons etc. Bootstrap is one of the most popular front- end framework with browser- compatible CSS code that can be modified for use, according to the website. The two bootstrap file are :
– bootstrap.css
– bootstrap.js
Install WordPress as well as Bootstrap on the system and start creating the code on a text editor in the manner explained below.
1. Creation Of New Theme Folder
After you have installed the WordPress package, access the dashboard and use the path
wp-content> themes
To reach the part where you will create a new folder of your theme. Check the image given below for reference :
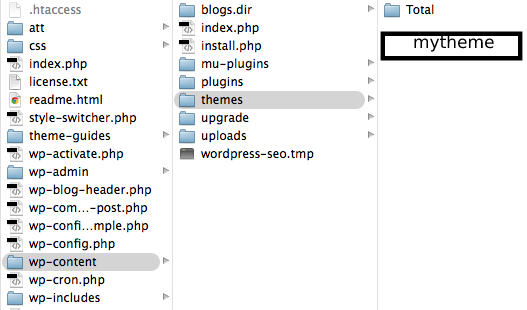
In this example, we will create a folder called “mytheme” in the highlighted box.
2. Creation Of header.php File
The code for the header section of the website needs to written first and the following code can be used by any developer for the purpose :
<html>
<head>
<title>Tutorial theme</title>
<script type=”text/javascript” src=”<?php echo get_stylesheet_directory_uri().’/js/jquery.js’; ?>”>
</script>
<script type=”text/javascript” src=”<?php echo get_stylesheet_directory_uri().’/js/jquery-ui.min.js’; ?>”>
</script>
<script type=”text/javascript” src=”<?php echo get_stylesheet_directory_uri().’/js/bootstrap.js’; ?>”>
</script>
<link rel=”stylesheet” href=”<?php echo get_stylesheet_directory_uri().’/css/bootstrap.css’; ?>”>
<link rel=”stylesheet” href=”<?php bloginfo(‘stylesheet_url’); ?>”>
</head>
<body>
<div id=”ttr_header” class=”jumbotron”>
<h1>HEADER</h1>
</div>
<div class=”container”>
This file contains the code in which javascript and style files are linked for enabling the display of the header and the following line of the code commands WordPress to load the style file necessary for the styling of the interface :
<link rel=”stylesheet” href=”<?php bloginfo(‘stylesheet_url’); ?>”>
For easy customization, the inbuilt CSS files of Bootstrap are used and .css files of the framework must be saved in the theme/css folder. This is the line of the code enabling the usage of the framework :
<link rel=”stylesheet” href=”<?php echo get_stylesheet_directory_uri().’/css/bootstrap.css’; ?>”>
3. Creation Of index.php File
The next step in the process of manual custom WordPress template development is the creation of the index.php file which is necessary for the display of the main content of the website. Use the following code for the purpose :
<?php get_header(); ?>
<div id=”ttr_main” class=”row”>
<div id=”ttr_content” class=”col-lg-8 col-sm-8 col-md-8 col-xs-12″>
<div class=”row”>
<?php if (have_posts()) : while (have_posts()) : the_post(); ?>
<div class=”col-lg-6 col-sm-6 col-md-6 col-xs-12″>
<h1><?php the_title(); ?></h1>
<h4>Posted on <?php the_time(‘F jS, Y’) ?></h4>
<p><?php the_content(__(‘(more…)’)); ?></p>
</div>
<?php endwhile; else: ?>
<p><?php _e(‘Sorry, no posts matched your criteria.’); ?></p>
<?php endif; ?>
</div>
</div>
<?php get_sidebar(); ?>
</div>
<?php get_footer(); ?>
Read the code carefully and you will find how the first line includes the header.php file while the lines at the end include the sidebar.php and footer.php file. The highlighted part of the code is responsible for the display of all the content that has been created through the WordPress admin dashboard. The empty div after this line :
<?php get_sidebar(); ?>
separates the main area from the footer and the sidebar.
4. Creation Of footer.php File
A simple footer can be added with the help of the following lines of code and if it is so desired, links or some additional content like contact information can also be added here :
<div id= “ttr_footer”>
<h1>FOOTER</h1>
</div>
</div>
</body>
</html>
5. Creation Of sidebar.php File
The sidebar is used for the display of items like “Category” or “Archives” and the file can be created with the help of this code :
<div id=”ttr_sidebar” class=”col-lg-4 col-md-4 col-sm-4 col-xs-12″>
<h2 ><?php _e(‘Categories’); ?></h2>
<ul > <?php wp_list_cats(‘sort_column=namonthly’); ?> </ul>
<h2 ><?php _e(‘Archives’); ?></h2>
<ul > <?php wp_get_archives(); ?> </ul>
</div>
6. Creation Of style.css File
This is the file that controls the appearance of an interface and the following code will set the background and the border for the content area :
body
{
text-align: left;
}
#ttr_sidebar
{
border-left: 1px solid black;
}
#ttr_footer
{
width: 100%;
border-top: 1px #a2a2a2 solid;
text-align: center;
}
.title
{
font-size: 11pt;
font-family: verdana;
font-weight: bold;
}
A very basic theme can be created through this above mentioned procedure and any person with knowledge of PHP, HTML and WordPress can add other content like images and videos to enhance the appearance of the website.
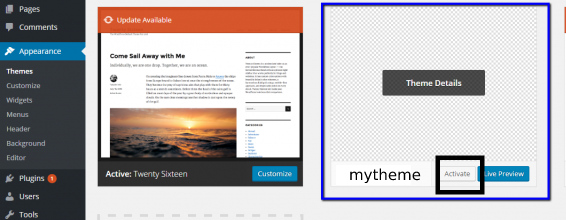
7. Activating The Theme
Once all the files have been saved in the “mytheme” folder, activate the theme by using the path of the dashboard :
Appearance > Themes
The following image will provide a better idea of how to do the job and complete the process :
Conclusion
The growing demands of owners for creation of unique interfaces has made it compulsory for professionals to possess the knowledge of custom WordPress template development and this guide will be helpful for any developer in manually undertaking the task.